Showing posts with label design team. Show all posts

Friday, December 18, 2015

{crafty} Christmas Wishes Blog Hop

Hello there! I'm blog hopping with Pinkfresh Studio today, showcasing the FABULOUS Christmas Wishes collection! You should have come here from Aimee's blog. If not, head on over to the Pinkfresh Studio blog to start from the beginning!

I've been wanting to do December Daily for years now but never quite had my act together to get it done. Or even start it. Well this year I have vowed to conquer it!! Christmas wishes is the perfect collection to use as a base for my album.


I can't even begin to pick a favorite item from the collection, but the puffy stickers and alphas are a good place to start. I mean, seriously!? Cuteness!


Speaking of cute...the deer. the squirrel. All the wintry animals. They are whimsy perfected.


I LOVE label stickers. I use the heck out of them. The label die cuts and gold foil stickers say pretty much everything you would ever want to say in a December Daily album!


Have I gushed enough?? Seriously. I love this collection that much. I have many more pages to go in my album but I think I'm off to a good start!

Cassandra is your next stop in the hop! Be sure to comment along the way. One winner will be chosen from all the comments to win a prize package from Pinkfresh Studio worth $150!! Awesome, right?


And I want to give a HUGE shout out and special thanks to Kinnari at Pinkfresh Studio! She is amazing to work with, and sadly this is my last month on her fabulous Design Team. It's been so much fun!
Amanda ---- YOU ARE HERE
UP NEXT ----Cassandra

Friday, May 15, 2015

{crafty} Pinkfresh Studio May Blog Hop


Hello there! Welcome to the Pinkfresh Studio May kit reveal blog hop!  If you came from Agnieszka's blog, you are in the right place! If not, head over to the Pinkfresh blog to start from the beginning.

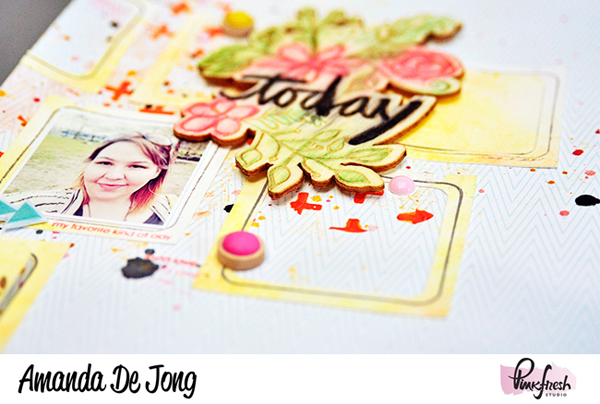
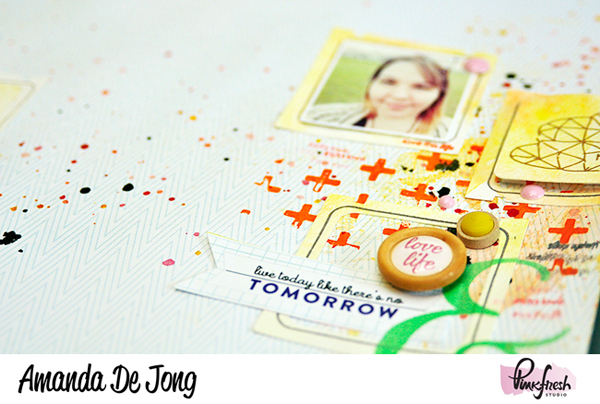
I had some fun with this kit! I really loved the stamp set this month. Then again I do every month! I started with repeatedly stamping that fun doodle frame to create a grid like pattern for my background. Of course, I can't leave it that simple! I used a couple stencils with paint and modeling paste, stamped, misted, embossed. Pretty much a little of everything. 


I used the glassine envelope that the veneers in the kit came in to create a little confetti pocket layer behind my photo. I filled it with the yellow heart sprinkles as well as the blue square sequin from the March kit.

Epoxy stickers are pretty much my favorite thing ever. I love both the badges and the two tone diamonds in the kit. I had to restrain myself from using more of them on this layout!

Be sure to like Pinkfresh Studio on Facebook and Instagram for more inspiration. Don't forget to stop back at the Pinkfresh Studio blog and leave a comment for a chance to win the May embellishment kit! The winner will be chosen Wednesday the 22nd.

>>>Up next in the hop is Cassandra!<<<

Thanks for looking!

Wednesday, April 15, 2015

{crafty} Pinkfresh Studio April Blog Hop


Hello there! Welcome to the Pinkfresh Studio April reveal blog hop!  If you came from Agnieszka's blog, you are in the right place! If not, head over to the Pinkfresh blog to start from the beginning.

I have so much fun playing with these embellishment kits that I often use nothing else on a layout besides some essentials, yes that includes paint and mist for me! ;-)  I did pull in a few small pieces from the Up in the Clouds collection and previous kits here as well.


I used the die to cut out several frames from a watercolor background I created and then used the coordinating stamp set to border each frame and add sentiments.


The wood veneer designed by Wilna Furstenberg is just gorgeous! I colored it in with Tim Holtz distress markers and then sprayed a little water on it to bleed the color.


 Leave a comment below and on each stop along the way to enter to win the full April kit! And don't forget to stop back at the Pinkfresh Studio blog and comment on your favorites from the hop for your final entry! The winner will be chosen Wednesday the 22nd.

>>>Up next in the hop is Cassandra!<<<


April Embellishment Kit


Thanks for looking!

Sunday, February 15, 2015

{crafty} Pinkfresh Studio Blog Hop


Welcome to the Pink Fresh Studio February Kit Release Blog Hop! I am so excited to be sharing the February kit with you!  You should have arrived from Agnieszka's blog. If not, you can go back to the PinkFresh Studio Blog to start from the beginning.


I am just having so much fun with these kits! I really wanted to use a little bit of everything on this layout. I loved those watercolor cards and knew instantly that I wanted to use them as a grid type background. All the embellishments worked so well together and really pulled this layout together! 


Have you subscribed to the kits? I have two layouts done so far and have a ton of product left to use! There is so much to work with! What's your favorite embellishment in the February kit? 


Thank you so much for hopping with us today! Next on the hop will be Cassandra! But before you go, Pinkfresh Studio will be giving away one January kit and one February kit!

To be entered to win one of these fabulous kits

1. Comment on the Pinkfresh Blog {February kit release post} 

2. Like Pinkfresh Studio on Facebook 
3. Follow Pinkfresh Studio on Instagram


Winners will be announced on the Pink Fresh Studio Blog Monday February 23rd

“Pinkfresh sneaks start the 5th of every month,
Kit is released on the 15th of every month” get your Pinkfresh Studio Subscription today!


Monday, September 8, 2014

{crafty} Pretty Little Pinkfresh

Hello there! 

Pinkfresh Studio is so excited to join with Pretty Little Studio today to inspire you with some cute creations. You should have come directly from the Pretty Little Studio blog. If not, be sure to head back over there!


It has been so fun to pair these two companies together! While Pinkfresh is normally known for bright and unique items, Pretty Little Studio is known for their fun vintage inspired products!They have definitely combined to create some awesome projects!


For my first layout I new I wanted to use several of the Chrysanthemum Mini Tags from PLS. I layered them on my page before adding a layer of gesso and gelatos. As soon as I decided to orient them at the top of the page I knew I wanted to to add lots of string and falling feathers. I just love how the soft colors and vintage number die cut pairs so nicely with bold color and graphic embellishments from Pinkfresh. 


My second layout is more linear and structured. I find I tend to go that direction when I want several photos on a layout. Since I have several busy photos I resisted the urge to layer the embellishments and really just tried to let them shine on their own. 


Supplies used: Wood Drop Stickers Chevron Brights, Foil Printed Alphas Mint/GoldVacation Chips Wood Veneer, Anya Alpha stampLimited Edition kit Studio Puffs. Watercolor Summer Word stickers, Birds Nest Bunting Flags, Peony Paper Ribbons, Wild Berries Paper Ribbons, Clematis tabs, Gold Circle Vellum


Thanks so much for looking today! Your next stop is Agnieszka Piskorz, head on over to her blog to see how she paired these two companies together!  Visit each blog in the hop and comment on each to enter a giveaway including the Pinkfresh Studio blog. One winner will be chosen for each day and winners will receive 30.00 worth of stuff from Pinkfresh Studio and 30.00 GC from Pretty Little Studio. This is going to be 2 days of blog hoping fun. Winners will be announced on 9/15. Good luck!


On top of the awesome giveaway I mentioned Pinkfresh Studio and Pretty Little studio are also offering special discounts during the hop! It's a great time to do some shopping!


Monday, July 21, 2014

{crafty} Blog Hop with Neat & Tangled

Hello there! I am so excited to be blog hopping today with Pinkfresh Studio and Neat & Tangled! I just love the stamps Neat & Tangled has to offer and they compliment Pinkfresh embellishments perfectly! You should have come directly from the Pinkfresh Studio blog, if not be sure to head back there to start from the beginning!

 I have two very different, other than my obvious affinity for yellows/oranges, layouts to share today.

For my first layout I really wanted to breakout my gelatos that haven't seen much use lately. I started by stamping the So Very Blessed image on to my cardstock with versamark and embossed it with clear embossing powder. I didn't quite like how it turned out so I re-stamped and embossed with white. The image ended up a little thicker, but I love the added dimension it adds, though you can't see it so well in the photos. Next I spread gesso all over my paper and stamped into it using the Diamonds stamp. Once that was dry I scribbled on a few gelato colors, sprayed it with water and moved some color around. Again had to wait for that to dry and then I lightly stamped using Diamonds again with more gesso. With my background complete I added my pictures and embellishments from the Pinkfresh limited edition kit that I just can't seem to get enough of!!


Supplies Used: Pinkfresh Studio: Puffy Borders, Label Frames and Transparent cards from Limited Edition KitLight Gold Glitter Washi, Color Blocked Triangles, Neat & Tangled: Diamonds and So Very Blessed

For my second layout I created a grid type pattern at the bottom with more items from the Pinkfresh kit as well as stamping with Neat & Tangled's Ink Splash and Sunburst stamps. For the upper portion of my layout I used the So Very Blessed as my focal point.

Supplies Used: Pinkfresh Studio: Puffy Borders, Label Frames, Canvas Tag, Transparent Inline Alphas and Transparent cards from Limited Edition KitColor Blocked Navajo Arrows, Color Blocked Hearts, Everyday Sayings Printed Veneer. Neat & Tangled: So Very Blessed, Sunburst and Ink Splash

Next up in the hop is Jocelyn Olson. Head on over to her blog for more inspiration! Make sure to visit each blog and comment on each to enter a giveaway including the Pinkfresh Studio blog. One winner will be chosen for each day who will receive $20.00 worth of products from both companies. This is going to be 2 days of blog hopping fun. Winners will be announced on 27th july. Good luck!"


Monday, June 2, 2014

Color with Pinkfresh

I have two new layouts on the Pinkfresh Studio blog today that are all about COLOR! Head on over to the Pinkfresh blog to see the full layouts!


Thursday, November 21, 2013

{crafty} Thankful with Glitz


There are many things I am thankful for but my family and my surroundings are certainly at the top of my list. I am so blessed with an amazing husband and a incredibly quirky son who never fail to bring a smile to my face every day. And while I sometimes take it for granted in the day to day I often find myself in awe of the beauty God has created all around us and it brings so much peace in to my life. I live a truly blessed life. And I am so thankful for it!


What are you thankful for?

Supplies:
Glitz Design "Uncharted Waters" Element Pack 1
Glitz Design "Uncharted Waters" Paper Pack 2
Glitz Design "Dapper Dan" Element Pack 1
Glitz Design "Finnley" Full Digital Kit
Glitz Design "Yours Truly" Element Pack 2
Glitz Design "Yours Truly" Paper Pack
Glitz Design "Sunshine in My Soul" Element Pack
Glitz Design "Wild & Free" Element Pack 1

Other:
One Little Bird staples, Valorie Wibbens bow and stitches, Paislee Press wordart stamp


Friday, November 8, 2013

{crafty} Feathers and a Tutorial


This week Glitz Design is focusing on the current feather trend. Wild & Free and Finnley both have an assortment of fun feathers to choose from so I knew I wanted to pull elements from both of those kits. The woodgrain patterns from Dapper Dan were perfect to balance out the vibrant color from the other collections.

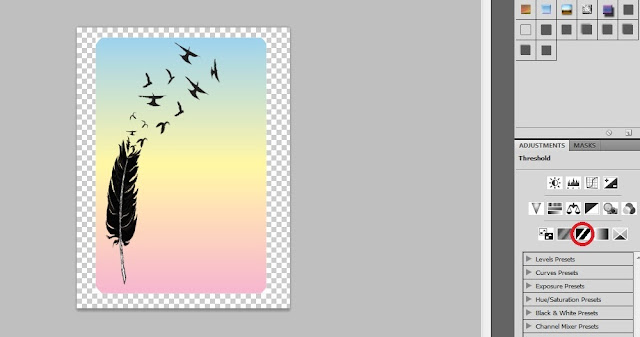
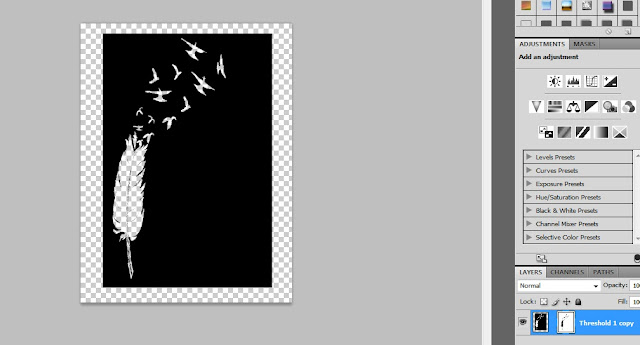
I knew I wanted to take this feather/bird image from Wild & Free and create a large cut out in my background. To do this in PS I opened the image and clicked on "Threshold" to turn the image to strictly black and white.
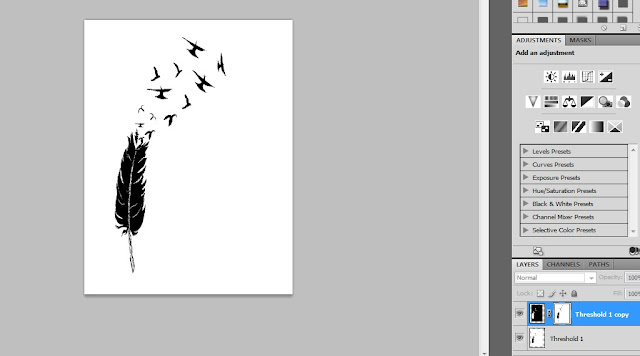
Next, you duplicate your layer and with the new layer selected click on ctrl + i to invert the image. With the inverted image still selected add a layer mask. Go back to your original image layer and select all and copy. Then hold alt and click on your layer mask from the duplicate layer and paste.
Next you can delete your original layer, the one without the mask, and you will be left with a black and transparent image that you can now use as a clipping mask. 

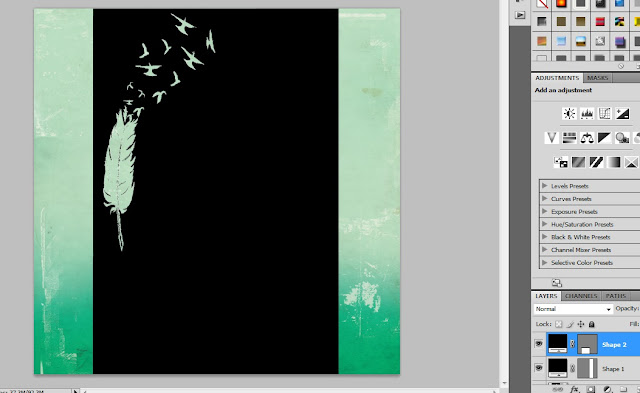
I open up my paper in a new window and paste my clipping mask over the top to decide on placement. The black area of my clipping mask is where my background paper will be so what I have done here is add black rectangles to fill in the area.

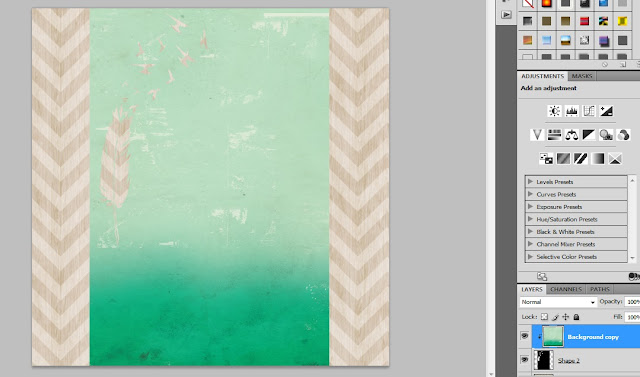
Next, select the shape layers and the feather layer and merge them together. Move the background paper above this layer and with it selected click ctrl + alt + g to clip your paper to the mask. Add your other paper behind it, and that's it! All that is left is to add a drop shadow to create depth. 

I hope that made some sense! I know there were more steps than photos but I tried not to make this too picture heavy. It does seem like a long process but once you do it once or twice it is quite fast. I'd love to hear if anyone has a different method of doing this!


Thank you for looking!