Showing posts with label edit. Show all posts

Tuesday, May 8, 2012

{flashy} "Hey Girl" Photo Challenge

Perhaps its because I am not quite done sharing about my trip to Cambodia (you wouldn't think so considering I have yet to blog about it since the first time over 3 months ago) or that I haven't ventured out with my camera as we are just now starting to see days of sun without rain, but I am again entering in a portrait shot in Cambodia for this months I Heart Faces photo challenge.


In villages filled with children so happy for some extra attention, that leaped in front of my camera smiling to ear to ear, this little girl caught my attention. She seemed to be curious but skeptical of why this big group of people who did not speak her language were spending the day in her village. I took her picture a few times, smiled at her, said "ah-goon" (thank you) one of the few words I learned, and went about my way as to not make her uncomfortable. I saw her a few more times that day curiously peeking around but never getting too close. I admit, I kind of wanted to give her a big hug and tell her not to worry :-)


Photo Challenge Submission

Friday, March 23, 2012

{flashy} Fix-It Friday #136

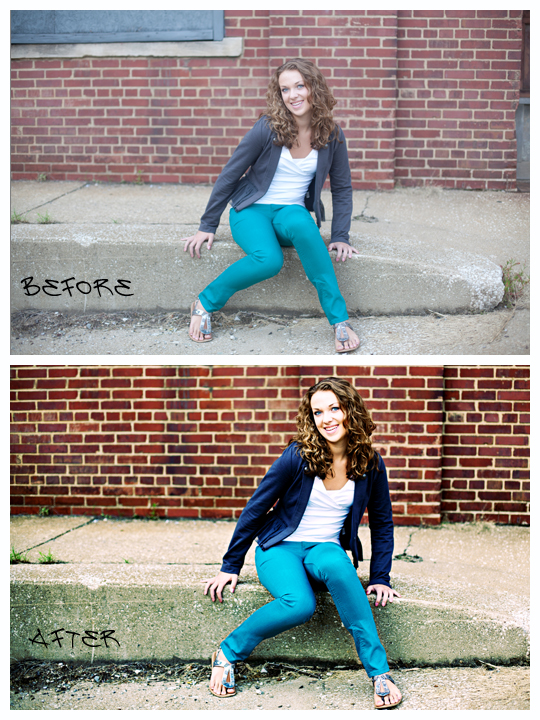
It has been quite a while since I have participated in Fix-It Friday over in the I Heart Faces community. When I saw the image up for editing today I knew I wanted to play! Editing my own photos, I often stick to basic clean edits but sometimes it is a nice break to have a little fun with it. I knew looking at this picture, by Angie Arthur Photography, that I wanted to give it a saturated urban feel. 

Here is what I did for my final image, it may look like a long list but each step is fairly basic

Edited in Photoshop CS4
  • Cropped
  • Selected a portion of the brick wall, feathered to 20px and copied to a new layer to get rid of the small amount of window that was left after cropping. 
  • Levels adjustment layer on each channel (you can see my tutorial on this here
  • Duplicated the background image and set to Overlay blend mode, reduced to 80% opacity and masked back her shirt to bring back some detail
  • Duplicated the background image and set to Multiply blend mode, reduced to 40% and masked back the girl. 
  • Duplicated the background image and ran a High Pass Sharpen with a radius of 20px and set to vivid light blend mode, reduced opacity to 35%
  • Duplicated the background image and set to Linear Light blend mode, reduced to 10%
  • Selective Color adjustment layer, selected Reds and reduced magenta to -50 and upped yellow to +5
  • Gradient adjustment layer with a violet/green/orange gradient, reduced opacity to 30% and masked back the girl at 50% opacity to reduce discoloration in her skin. 
  • Flatten layers and save. 


Friday, February 11, 2011

{flashy} Fix It Friday #86

I could not resist today's Fix It Friday picture over at I Heart Faces. This little girl is adorable and her expression is even more so!

Original photo

My first edit

I was imagining this picture as somewhat dark and dreamy and I am pretty happy with how it turned out in the limited time I had to work on it.

~ My Steps ~
  • opened in ACR and adjusted exposure
  • levels adjustment, on individual RGB channels
  • slight curves adjustment to bring up the midtones
  • black and white gradient map set to overlay blend mode
  • selected her cheek color and painted over her left cheek at a low opacity and flow to even out the shadows
  • very slight gaussian blur on the skin and hair
  • high pass sharpen
  • crop
  • duplicated layer, added rendered lighting
Rendered lighting isn't something I use often but it can be a very nice effect. Here is the same edit as above only without the rendered lighting


Honey Retro edit

I wish I could truly call this edit my own. With the same basic editing done on my first edit I ran the Coffeeshop Honey Retro action. I absolutely love this action. One of these days I will have to sit down and learn how to achieve the same look without it.

As always, if you would like to check out other edits done on this photo just click here!


Friday, January 28, 2011

{flashy} Fix-It Friday #84

Another Friday, another edit!

Original photo from I Heart Faces


My edit

Using CS4, the first thing I did was open the channels tab and click on load info (the dotted circle at the bottom of the box) This selects the highlights in the photo. I inversed the selection, which selects the shadows, and created a curves adjustment pulling the midtones up. This lightens the shadows without lightening the highlights.

The rest of my edit was fairly business as usual
  • curves adjustment, slight s-curve
  • levels adjustment, on each channel
  • duplicated background, multiply blend mode at 20% opacity, masked the girl back in
  • yellow fill layer, at 15% opacity
  • high pass sharpen
  • Nelly Nero gritty texture, at 15% opacity, masked the girl back in
  • cropped

Check out the rest of the edits!


Friday, January 14, 2011

{FLASHY} Fix-It Friday #82

Over at I Heart Faces they do a weekly participation edit. A contributor offers up a picture and anybody can join in and edit the photo. Looking through entries and checking out the steps somebody takes to edit is a great way to learn!

This is my first time participating, hopefully I did the picture justice!
The SOOC
(straight out of camera)


My Edit


I have to admit I don't always have a set workflow for editing. I like to play until I like it! Here is a quick run down of what I did with this picture.
  • Levels adjustment on all channels at 90% opacity
  • Second levels adjustment on all channels at 50% opacity
  • Brown gradient, hard light blend mode
  • duplicated background image at 85% opacity (this is to let the gradient come through)
  • duplicated background, screen blend mode at 45% opacity
  • High pass sharpen, overlay blend mode
  • High pass sharpen again, hard light blend mode
  • And a slight crop

You can click here to check out the rest of the edits!