Wednesday, June 4, 2014

Hello from my NEW craft space!

You may or may not have noticed, but my blog has been pretty quiet the last several months. To give you the short version of what life has been like we sold our house on December 20th, because moving 5 days before Christmas is a FANTASTIC idea. Hopefully you caught my sarcasm there. Unfortunately we hadn't found a new place so we ended up renting a house from some friends that had recently moved and just taken their house off the market to wait for spring to roll around. We lucked out there! We eventually got settled in there, my inlaws moved up from California and in with us and as soon as we got nice and cozy, all the while looking for a new house, our friends got an offer on their house completely out of the blue. Fortunately, the day we were supposed to move out and in to an apartment, we had an accepted offer on a house. We ended up moving in with friends for the two week overlap between houses and FINALLY we were able to move one more time in to a house we hopefully will not be moving out of for many many years. It was a crazy few months, constantly packing and unpacking all the while trying to keep up on other obligations. But it's done. Thank God! And I quite love our new house and all the plans we have for it as well!

So...on to the point of this post. I have a new craft space! You may have seen my previous room. If not, then I'll remind you! I had taken advantage of an alcove and utilized as much wall space as possible.


This time around I wanted something that would be easy to move around as my craft space is not in it's permanent location in the house. So now when I am ready to move it to another room I can do so rather easily and not leave 50 holes in the wall!

While my desktop is not as long as what I had before, I'm finding my space to be extremely functional and everything is still within easy reach. I think one of my favorite things may be my Tonic Guillotine hanging up on the side of one of my bookcases thanks to 3M picture hanging strips.


I do plan on painting the walls, but it's low on my to do list right now. In the meantime I am enjoying the natural light and finding time to create!


Monday, June 2, 2014

Color with Pinkfresh

I have two new layouts on the Pinkfresh Studio blog today that are all about COLOR! Head on over to the Pinkfresh blog to see the full layouts!


Thursday, November 28, 2013

{crafty} Finnley Blog Hop


Happy Thursday! I hope everyone in the US is having a wonderful Thanksgiving today! I am blog hopping today with not just the digital design team but the traditional team as well! It is a long hop, but I can guarantee you the inspiration will be worth it! 

I am not going to profess my undying love for the Finnley collection like I do every. single. time. I use it. Nope, won't do it! But I will show you my latest digital layout using said awesomeness.


Supplies:
Glitz Design "Finnley" Full Digital Kit
Other: The Lilypad twine and staple, One Little Bird label, Valorie Wibbens


Be sure to check out the rest of the Glitz DT and see what they have done with this collection and leave comments along the way! Two lucky winners will be chosen from all the comments. One will receive the full Finnley collection and the other will win the full digital kit!


YOU ARE HERE ------ Amanda DeJong
Amanda Resende ------ NEXT UP
Barbara Sokee 
Donna Espiritu
Emma Poon
Fauve Van Maanen
Jaime Warren
Jocelyn Olson
Karine Cazenave
Kym Tsukamoto
Laura O'Donnell
Lea Lawson
Lisa Andrews
Magda Mizera
Maria Lacuesta
Marie Ramirez
Mary Martinez
Miki Krueger
Mou Saha
Nina Ostermann
Noel Culbertson
Smitha Katti
Stephanie Bryan
Tiffany Wheeler
Glitz Design blog 


Thursday, November 21, 2013

{crafty} Thankful with Glitz


There are many things I am thankful for but my family and my surroundings are certainly at the top of my list. I am so blessed with an amazing husband and a incredibly quirky son who never fail to bring a smile to my face every day. And while I sometimes take it for granted in the day to day I often find myself in awe of the beauty God has created all around us and it brings so much peace in to my life. I live a truly blessed life. And I am so thankful for it!


What are you thankful for?

Supplies:
Glitz Design "Uncharted Waters" Element Pack 1
Glitz Design "Uncharted Waters" Paper Pack 2
Glitz Design "Dapper Dan" Element Pack 1
Glitz Design "Finnley" Full Digital Kit
Glitz Design "Yours Truly" Element Pack 2
Glitz Design "Yours Truly" Paper Pack
Glitz Design "Sunshine in My Soul" Element Pack
Glitz Design "Wild & Free" Element Pack 1

Other:
One Little Bird staples, Valorie Wibbens bow and stitches, Paislee Press wordart stamp


Friday, November 8, 2013

{crafty} Feathers and a Tutorial


This week Glitz Design is focusing on the current feather trend. Wild & Free and Finnley both have an assortment of fun feathers to choose from so I knew I wanted to pull elements from both of those kits. The woodgrain patterns from Dapper Dan were perfect to balance out the vibrant color from the other collections.

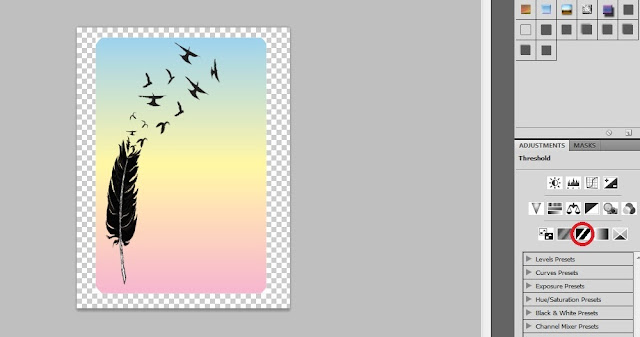
I knew I wanted to take this feather/bird image from Wild & Free and create a large cut out in my background. To do this in PS I opened the image and clicked on "Threshold" to turn the image to strictly black and white.
Next, you duplicate your layer and with the new layer selected click on ctrl + i to invert the image. With the inverted image still selected add a layer mask. Go back to your original image layer and select all and copy. Then hold alt and click on your layer mask from the duplicate layer and paste.
Next you can delete your original layer, the one without the mask, and you will be left with a black and transparent image that you can now use as a clipping mask. 

I open up my paper in a new window and paste my clipping mask over the top to decide on placement. The black area of my clipping mask is where my background paper will be so what I have done here is add black rectangles to fill in the area.

Next, select the shape layers and the feather layer and merge them together. Move the background paper above this layer and with it selected click ctrl + alt + g to clip your paper to the mask. Add your other paper behind it, and that's it! All that is left is to add a drop shadow to create depth. 

I hope that made some sense! I know there were more steps than photos but I tried not to make this too picture heavy. It does seem like a long process but once you do it once or twice it is quite fast. I'd love to hear if anyone has a different method of doing this!


Thank you for looking!